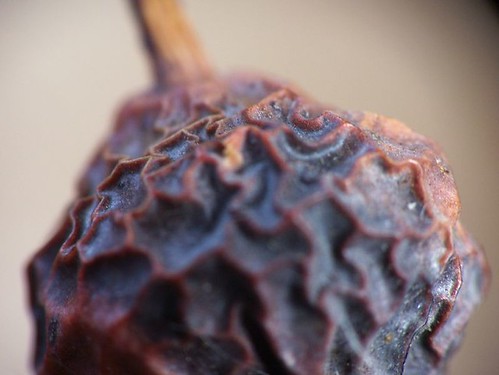
Photog : of a dried berry | Reverse Macro How To
. berry, Digital Color Photography, digital photography techniques, Flickr, Food Porn, photographyBy adding a traditional 35mm film lens in reverse, in front of my digital lens, I was able to capture the details of this dried berry. This was the natural coloring. I thought it was quite beautiful.
 |
| Reverse Macro of a dried berry, originally uploaded by Amber *. |
- Select a digital camera with at least 4mps. One with a larger lens opening than a standard "point & shoot" camera - when I mention point & shoot I am talking about the cameras with very small (dime - nickel sized) lens holes. I didn't have an DSLR with standard 35mm equivalent to use (my camera has a 28mm equivalent which worked great). The bigger lens hole will enable you to capture the light given off from the 35mm lens. To make this kind of shot, a built in flash is worthless, because the added length of both lenses creates a tunneling effect. It also helps to have a zoom power greater than 3, my camera has 10 optical zoom and 8 digital.
- Find a telephoto 35mm lens (you can experiment with different sizes and ranges), I used a [55mm - 117mm ] Pentax telephoto. It should have a lens lip or hood of at least 1/4 inch (this is found at the protruding end) or wider. This lip will allow you to hold the two lenses comfortably in one hand, but also position your lens close to the 35mm lens, and at the same time create a light barrier. A smoother, slide roll type barrel extender works better here too -- as this enables you to use light touches to adjust the magnification (i.e zoom) of the 35mm lens.
- Find a place to photograph your macro. It should be flooded with natural light (fluorescent lights or ambient light will not produce good results) a good time of day is in the early morning, or around 4 p.m, on a bright day. There should not be any object to create and caste shadows.
- Find your subject. This technique allows you to magnify the finest details --- like dust particles or tiny ridges, so find something that isn't necessarily interesting on it's own --- but would be neat in magnification.
- Position your subject. A box below your subject will prop it up so you aren't lurching over your subject. Try to position it in full light.
- Getting Ready For the Shot. Get situated in a comfortable stance, as this will take several shots and lots of adjusting to get it right. Position your hand around the bottom of your digital camera lens so that it is cradled in your hand. Make sure only half of your hand (i.e pinky and ring fingers) is touching that lens, as the rest of your hand (i.e middle, pointer and thumb) will be holding the 35mm telephoto lens steady in front of your digital lens. A safe spacing between the two is 1/4 "- 1/2 inch. DO NOT let your lenses touch each other --- as this will lead to scratching!! Position the lenses and then position the camera and lenses in front of your subject.
- Focus, focus , focus. The trick is to learn to focus your digital to pick up on the finer adjustments of the 35mm telephoto lens. I zoomed in with my digital half way, then I would move the telephoto to magnify more and more, all the while gently focusing with the telephoto. You will need to shift around your subject to create better shots. Try different distances and zoom.
- Practice, practice, practice. Get a feel for your camera and the two lenses working in sync. Try a variety of subjects and light strengths --- this will take a lot of shots and trial and error, so have your memory card handy.


