03 August 2008

Tutorials 16

Here is a list of popular tutorials on Renaissance Culinaire. Here you can learn step-by-step instructions on a variety of foodie related things. This page will be updated as more tutorials are added.


Learn How TO:

  • Reverse Macro w/ A Digital Camera

  • Procedure For Tuile Stencil Cookies

  • Make A Simple Proofbox for Home Use

  • Use Greasemonkey Scripts for Culinary

  • Make Shortbread Tarts

  • Shape Croissants

  • Make Chocolate Croissants

  • Make Great Pate a Choux

  • Be A Successful Baker

  • Find The Sex of a Dungenous Crab

  • Maintian Your Rolling Pin

  • Sheet Croissant Dough

  • Eliminate "Black Holes" in Food Photography Pics

  • Make your own Praline Paste 

  • Beat Cooking Anxiety!

  • Beat hunger in America ~ Find a Food Pantry in your area!

  • Women: Learn how you can be awarded a photography scholarship of your dreams!

  • How to find Edible Mushrooms in Oregon

  • Get your face or company logo on M&Ms

  • How to get the best food shots with a basic digital camera

  • Groups to join if you love food or are a foodie

  • Turn your kitchen into a licensed home bakery Part #1, and Part #2


  • These tutorials are written by me and are original content. These tutorials may not be reproduced without my permission.


    04 May 2008

    Croissant Madness 1

    croissants


    Here are a list of Croissant related posts from Renaissance Culinaire:

    Renaissance Culinaire Related Posts:


    03 April 2008

    How To Make a Simple Proof Box for Your Home 2

    If you have an area that is protected by drafts , where you can create a moist air with steam, then you can create a proof box.

    What you will need:

    • Get a standard shelf. [[Make sure it can fit a deep pan or bowl that you will use to proof your dough.]]
    • Wide sheets of heavy plastic / or tarp. [[Allow the sheet width to accommodate the width and depth of your shelf - so that you can tape the plastic sheet sides together]]
    • Heavy wide tape - such as duct tape or heavy packing tape.
    • Good sharp scissors for removing excess plastic.
    To Create your Proof Box:
    1. With sheets of new / clean, heavy plastic or tarp, Drape a plastic sheet over both the front of the shelf and the back. Gather the top of theses plastic sheets together , centering where the top of the sheets meet above your shelving, allowing it to drape to the length of the shelf, all the way to the floor.
    2. (Remove any excess plastic that is longer than your shelf length, or too wide on the sides.
    3. Using duct tape or heavy packing tape - Create a sleeve of the plastic sheeting with a sealed top, and leave the bottom open(this is where your "steam" will be created) , that you can slide over the shelf when you need to proof something --- by taping the top and side edges together, to form an air tight seal.
    Steam can be created by :

    1. Placing a bowl or pan you can add boiling water from a kettle to, at the bottom.
    2. Put your dough to be proofed on the shelves (on a pan or in bowl), and zipper the cover tight / or slide your newly designed sleeve until it touches the floor snugly . [[If using a store bought green house shelf --- You might want to tape the seams of the zipper, to prevent drafts. ]]
    3. Allow dough to rest for recipes specified proof time.

    If you don't want to DIY (do it yourself):
    **An indoor green house shelf unit (with a zippered plastic cover) that you buy for $20 .00 at Fred Meyers will work. Follow the "steam direction above.

    ***Or use your oven--- put your pan or bowl of dough, covered with a damp cloth, on the center wrack. Add a pan at the bottom and pour boiling water from a kettle into the pan. Proof as the recipe calls for.


    30 March 2008

    Dessert Costing : Banana Strawberry Torte 3

    This post is referencing a previous post dated Feb. 11 2008 : Food Photography : Strawberry Banana Torte

    So David here are those details, as promised. I created this post using Google Docs. Google Docs rocks my blogger socks off! I can just click a button and post a nicely formatted post. I plan to use this tool more in the future.

    The purpose of this post is to show you readers how to find a base cost for a plated dessert and what goes into those calculations


    Costing Formulas:

    ☆ Ingredient weight (divided by ingredient unit cost) = ingredient cost per lb/oz
    ☆ Ingredient cost per lb ( divided by number of oz) = cost per oz
    ☆ Ingredient cost per oz/lb multiplied by formula ingredient weight = final ingredient cost. ☆ Final ingredient costs added together = total dessert cost
    ☆ Total dessert cost ( divided by dessert serving number / weight) = per serving cost
    ☆ Per plate cost added to garnish/decoration cost = total per plate cost

    # = lb

    Ingredient Cost per unit Cost per lb Cost per oz Ing. weight final cost Used in
    Milk 4# = $1.59 0.40 .03 1.5 oz .05 French sponge
    G. Sugar 50# = $25.70 0.57 .04 6 oz .24 sponge
    Egg 18# = $16.80 .93 .06 2.5 oz .15 sponge
    Cake Flour 50# = $9.99 .20 .01 4 oz .04 sponge
    AP Flour 50# = $11.94 0.24 .02 2 oz .04 sponge
    Vanilla ext. 8# = $65.40 $8.16 .51 .125 oz .06 sponge
    B. Powder 10# = $12.90 $1.29 .08 .17 oz .01 sponge
    salt 25# = $7.30 .29 .02 .05 oz .01 sponge
    Butter 36# = $52.56 $1.46 .09 1 oz .09 sponge


    Banana Scented Marscapone
    Ingredient Cost per unit Cost per lbs Cost per oz Ing. weight final cost Used as
    Marscapone #3 = $7.76 $2.59 .16 8 oz $1.28 frost
    Banana Compound 38.8 oz = $13.50 $5.60 .35 1.5 oz .53 frost
    G. Sugar 50# = $25.70 0.57 .04 .04 4 oz frost
    Vanilla Ext. 8# = $65.40 $8.16 .51 .25 oz .13 frost

    Total ------ ----- $1.58 .10 -------- Dessert


    Strawberry Sauce
    Ingredient Cost per unit Cost per lbs Cost per oz Ing. weight final cost Used as
    Strawberry Puree 2.2# = $10.51 $4.96 .31 8 oz $2,48 sauce
    G. Sugar 50# = $25.70 0.57 .04 8 oz .32 sauce
    Water -------- ------ ----- 12 oz ----- sauce

    Total ------ $1.60 .10 ----- ------- garnish


    Midori Simple Syrup
    Ingredient Cost per unit Cost per lbs Cost per oz Ing. weight final cost Used as
    G. Sugar 50# = $25.70 0.57 .04 8 oz .96 syrup
    Midori liqueur 24 oz = $20.95 $13.92 .87 4 oz $3.48 syrup
    Water -------- -------- ----- 4oz ---- syrup

    Total ----- $2.74 .17 ------
    garnish


    Honeydew - Midori Sauce
    Ingredient Cost per unit Cost per lbs Cost per oz Ing. weight final cost Used as
    Honeydew puree .62 per melon ------ ------ ¼ melon .16 sauce
    Midori liqueur 24 oz = $20.95 $13.92 .87 2 oz $1.74 sauce
    G. Sugar 50# = $25.70 0.57 .04 8 oz .32 sauce
    Midori simple syrup ----- $5.92 .37 6 oz $2.22 sauce
    Cornstarch 25# = $14.98 .60 .04 .75 oz .03 sauce

    Total ----- $4.48 .28 ---- ----- garnish


    Dessert Garnishes
    Ingredient Cost per unit Cost per lbs Cost per oz Ing. weight final cost Used as
    Choc. Plate Design 11# = $36.19 $3.59 .22 ¼ oz .06 garnish
    Strawberry Sauce ----- $1.60 .10 ¼ oz .03 sauce
    Honeydew-Midori sauce ------- $4.48 .28 .5 oz .14 sauce
    Fresh strawberry 1# = $1.99 $1.99 .12 2 oz .06 garnish
    Fresh Kiwi .33 each ----- ---- 1/5 kiwi .07 garnish
    Choco. Decoration 11# = $36.19 $3.59 .22 ¼ oz .06 garnish
    Strawberry puree 2.2# = $10.51 $4.96 .31 .5 .16 Dec.fill


    Dessert Cost
    Total Cost No. Servings Per Plate Cost Garnish cost Final Plate Cost
    $1.24 8 .16 .58 .74

    These prices reflect the cost of making the dessert alone by ingredients involved and do not reflect the menu cost delivered to the restaurant customer. There are many ways to calculate the menu cost of an item, which includes using specifc formulations to calculating labor cost and a variety of other factors.


    numly esn 48210-080330-399239-18 Rate content:

    © 2008 All Rights Reserved. No Portion of these formulas or document may be reproduced or copied without permission.

    05 October 2007

    Baking Theory Notes: Mixing Geekdom 2

    Popular Dough Styles Methods of mixing dough, in bakery settings. If you analyze your home recipes procedure, you may notice most of your home bread or pastry recipes might mirror:" sponge & dough" or " straight dough" methods.


    *Sponge & Dough Method


    Very widely made.

    --->Basic Formulation / Procedure:
    1. Mix half of the flour, yeast , malt , water @ <72°f> = sponge.
    2. Let it rise 3½ hours --- shake it, if it is done it will drop away from the sides.
    3. Remove sponge from your container, add to mixer with remaining flour, salt etc.
    4. Mix until gluten is developed.
    5. Bake
    Advantages of Sponge & Dough method :
    • Better Flavor
    • Flexible --- In sponge stage you can leave sitting on the bench.
    • Better (tighter) crumb
    { This equals to ( 2) mix s and (2 ) fermentations {one in bowl , one in oven}

    *Straight Dough Method
    1. 1 mix
    2. 1 fermentation
    Advantages of Straight Dough Method:
    • Faster
    • Uses less electricity
    • Easier on equipment
    • Less Labor
    *No-time Straight Dough Method
    No fermentation. Additives cause "rise" activating Enzymes that normally developed during fermentation.
    Basic Formulation / Procedure:

    1. Mix ingredients. Warm up the dough (i.e via mixing friction)
    2. Add more yeast
    3. Add Fructose (yeast can eat this faster)
    4. No Rounding --- Scale & put into pans to bake
    Disadvantages of No-time Straight Dough Method:
    • Flavor IS compromised (from lack of fermentation)
    • Bad shelf life (unless you add additives)
    • No flexibility --- from mixer to oven (reminds me of "from zero to sixty")
    For more info on dough related baking info go here.

    04 August 2007

    Baking Theory Notes : The Yeaasty Boyz 1

    I liken Yeast to the popular and oh-so-old skool group ,The Beastie Boys. Both groups - whether rockin' the mike or the mixer, if given the best environment, will rock hard...and go on and on and on, improving on flavor. They both are fueled on additives and are a product of alcohol, whether that means straight drunk or chemically.....they get ill.


    Beastie Boys by LaMoe79

    YEAST

    Purpose: Leavening of doughs
    Optimum Temp: (to warm 33-40°F) (♥ prefer. 33-38
    °F) as temp. deteriorates over time.

    When Yeast is activated: 45
    °F

    Thermal Death of Yeast: 140
    °F
    Types:

    ----> Compressed Yeast
    • 73% moisture
    • Needs to be as fresh as possible for use.
    • Refrigerated
    • Has not been processed as much as dry yeast.
    • Fresh yeast is best for products to be frozen
    Conversion Rate {If formula calls for Active Dry Yeast, you will need 2½ X [the amount in formula] = amount of compressed yeast needed}
    ----> Active Dry Yeast
    • Can be stored for 1 month.
    • Has to be reconstituted in 4x it's weight.
    • Not used as frequently in bakeries, as in restaurant kitchens.
    Conversion Rate {To substitute Compressed Yeast in a formula : multiply 2½ X [the amount of Active Dry Yeast] = amount of Compressed Yeast needed }

    ----> Instant Dry Yeast

    • Shelf life of 1 year
    Conversion Rate {To substitute Instant Dry Yeast in a formula calling for compressed: multiply 3 X [the amount of Compressed Yeast ] = amount of Instant Dry Yeast needed }

    For More Yeast Info: Go here

    29 July 2007

    Baking Notes : On Proof Boxes, Hints for newbie Baker 2

    Proof boxes aren't necessary for a bakery, especially a small one, over time you learn to "feel" the doughs textures --- from mixer to bench, from bench to board, from board to oven. This is the unspoken seventh sense those "one" with the dough possess.
    Like everything, baking is akin to Star Wars. "Just as the path of a Jedi is often difficult, filled with conflict and pain". As is the path of the newbie baker.

    "To become a Jedi requires the deepest commitment and most serious mind. It is not a venture to be undertaken lightly. As such, Jedi instruction is rigidly structured and codified to enforce discipline and hinder transgression... A Jedi who fails in his training can be a very serious threat. The dark side of the Force beckons to the impatient, and students in the past have been lured to its call with devastating consequences."


    In The Empire Strikes back, Young Luke Sky walker, motivated by the spirit of Jedi
    Obi-Wan Kenobi , ventures out into Dagobah swamp ( of the Dagobah Systems) inhabited by Yoda , Jedi Master. While in Dagobah swamp, Luke Skywalker learns the "ways of the Force" from Yoda, and to hone his Jedi abilities.

    And just as Luke Skywalker before you --- Newbie Baker, You too will learn to harness your "baking" abilities.


    Every baker --- whether novice or master, all venture into the unknown realm of chemical activity, the eclectic rhythms guiding hands and thoughts into a carbohydrate fueled symphony. With each turn of dough, each shaping of a round, your mind will develop a map of sensory memories. If you are new to this baking realm, don't just make mental notes, make visual and textural ones as well . If you follow this simple plan, the "baking" force will become strong within you.


    A.K.A "Proofer" , "steam box" ,"Steam Cell"

    Proof Box Advantages:

    • Control temp. & humidity
    • Proofs at same humidity & temp. , regardless of weather.

    Capacity

    • If oven is full at all times, you have gained proper efficiency.
    Larger proof box vs. small oven:
    • [2 : 1] or [3 : 1] ratio {2-3 pans proof to every 1 pan bake in oven}
    • 1 hr proof : 20 min of baking time = more profit / cost effective
    Why Invest in a Hydrometer:
    • Measures exact humidity in air
    Proof boxes are notorious for being unbalanced in humidity.


    TYPES:

    Cabinet Proofer
    Characteristics to Look For:

    • Corrugated Steel ledges to hold sheet pans:
    If you can't purchase a proofer with wire supports. Solid steel doesn't work as well, when the ledge makes contact with the sheet pan, it will block steam which rises from the bottom of the Cabinet Proofer (the bottom is where the controls are housed). This will affect your proof.

    • Walk-in Cabinet Proofer
    These proofers have better ventilation and are much sturdier.

    • Wire holders/supports for sheet pans
    Supports (i.e solid steel / corrugated) tend to break off. Or need to be readjusted. Purchasing wire supports will cut down repeated maintenance.


    Rack Proofer
    Advantages:

    • Best Performance
    • All sizes, to meet space requirements/ production yields
    • Good for production

    Retarder Proofer
    Advantages:

    • Has variable temps (frozen to thaw --> to proof) timer.
    Shelf Type Proofer
    Features:

    • Removable shelves
    • Frozen bake-off operations (Main use)
    • Proofer is stacked on top of oven
    Disadvantage:

    • Not ergonomically designed


    11 July 2006

    Photog : Windows -The soul of Dough 0

    There is no gluten structure in this dough --- lots of holes and the dough breaks away when pulled because it needs further mixing to develop the gluten.


    The Window: A meshing of gluten strands!
    Tight like a drum --- the gluten strands have become meshed and the dough is done mixing. If you tap this "window" --- it will hold up and bounce back without tearing.


    A Window - meshing of gluten strands!

    19 December 2005

    Chocolate column 4

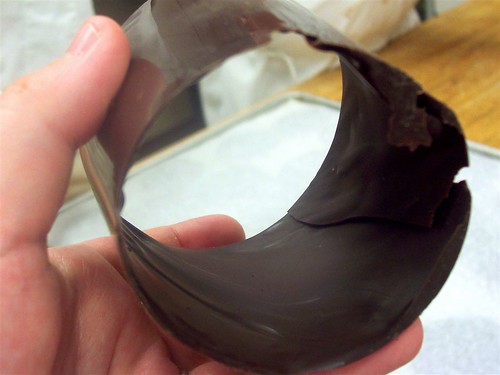
    When chocolate is tempered (a series of temperature drops to encourage the forming of a specific crystal which allows the chocolate to harden), you can do just about anything --- this accetate strip was rubbed into a stream of tempered chocolate, until evenly coated. The coated side is then turned inward, then taped to form a column. These column are then set aside to harden. Once hardened the accetate strip is removed.

    Here you can see the inside.


    Chocolate column, originally uploaded by Amber *.


    Please stop by to see my latest template upgrade, I promise it won't disapoint! After recoding and tweaking --- I think I am finally happy now.

    Today we had a winter storm...the snow was blowing sideways...brrrrr!

    I have been doing alot of pondering, more specifically along the lines of "Pay it forward"; If America or the World ever needed this concept--- they definetly could use it NOW!

    I am thinking about all the practically nameless people, who have connected with me, in the vast cyber universe.

    I browse their webpages,tinged with subtle clues from their non-cyber lives --- proof of an outside world.

    Touched by the words on glowing page, after glowing page. A testament to human emotion. Sheding light on our own disablities or insecurities; making a mockery of our own sarcasms.

    We are not "the blind leading the blind" , nor our we drifters.

    We float on bandwidth --- toggled to our keypads. Clicking link, after ugly colored link.

    Seeking out the most current and relative information.

    Until our eyes strain, our heads fall heavy....overrun with the immaterial.

    22 May 2005

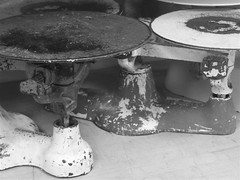
    Photography : 16 lb Scales 1


    16 lb Scales
    Originally uploaded by abstract2concrete.

    Scale, Scale, Scale --> That is what encompasses most of your time in a scratch bakery. Scaling out every ingredient, so as to have the right percentage in your formula. If your scaling is off -- then your product will lack in quality and quantity.

    28 March 2005

    Baking Theory: Dough Preparation & Fermentation 4

    Steps as a Successful Baker :

    - Have Balanced Formulas

    --- A collection of formulas that work
    --- Formulas you have tried out in your bakery & changed to suit your needs
    --- Be a Control Freak
    --- Have Consistency every time!
    --- Know Functions of Ingredients in your formulas, so as to predict the outcome.

    -Know Proper Mixing

    [1st speed]

    --- Remember your Goal is Consistency
    --- know that To Control consistency, hold back water.
    --- Know NEVER to control mix with flour!

    --> Gluten Development

    [
    2nd speed]

    --- know Proper gluten development VERY important, if dough is mixed too long gluten will separate.


    *know your 3 main types of mix:

    [Short ] {uneven gluten, tears window}

    Uneven Window


    [Intensive] { not quite a window, small tears}

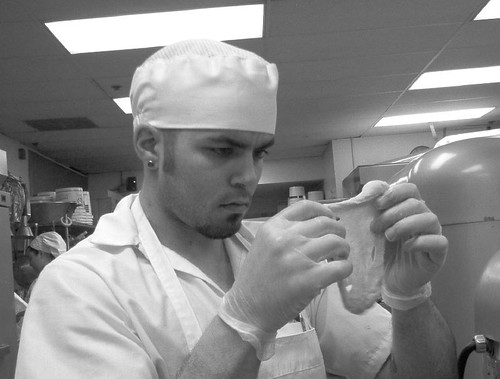
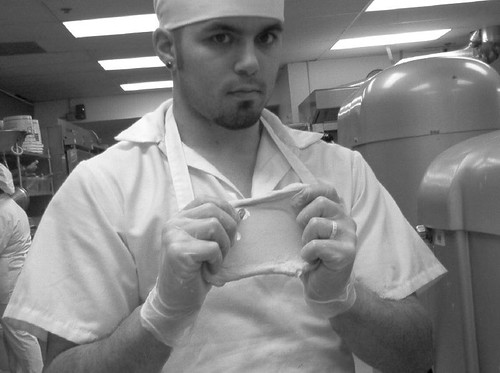
    [Improved] {fully developed window, feels like skin}

    Fully Developed Window


    {To check for the development of your dough :
    1. Stop mixer, tug on a piece of dough {always from the bottom, due to more consistent mix} You will feel an elastic feel the longer you mix.
    2. Take out the piece of dough. Start pulling from the bottom of your dough piece Until it is very thin in the middle & forms a window. Let the dough get pliable in your hands -- do not force the stretch.
    3. Hold on sides, & hold up the "window" to the light. You will see the gluten will form "strands" criss-crossing in your dough like a crude mesh , as it starts to develop.
    4. Gently touch with a finger - if it is taught, the dough is ready for the next step}


    - Know Fermentation

    {note :
    artisan bread doughs have longer fermentation}

    --- Longer fermentation means shorter mixing.
    --- Gluten is modified {Acidity = Flavor}

    [ Dough Temperature] [completion of mixing]
    { Best environment for fermentation is 50°F & 80% humidity. Dough doesn't ferment well under 40° F}

    ---78°F - 84°F [can be as low as 74°F]
    ---If you lower temp. fermentation slows
    ---If temp is raised fermentation speeds up.
    ---Remember cool doughs make for the best fermentation.

    [ the process of Fermentation ] [alcoholic fermentation starts]

    ---Remember fermentation starts as soon as mixer stops.
    ---This is the MOST important part of bread making
    ---Gluten is biochemically modified
    ---improved stretchability
    ---improved elasticity
    ---Carbon dioxide gas is produced
    ---Acidity

    -When Scaling out dough

    {an efficient experienced baker can handle 8 gal at a time}

    ---You should never scale out more dough than you can handle in 15-20 minutes. Or dough will ferment further while sitting & product will be nonuniform[larger] .

    -Tips for Rounding & Shaping

    { Additional Gluten development = mix + folding (bench work) }

    ---Pre-shaping
    ---Cover after pre-shape or "crust" will develop

    - Intermediate Proof or Bench Time

    ---The time when dough has been rounded & now resting under plastic.

    - Molding & Shaping

    ---Flatten dough rounds out to expel gas
    ---Shape into final loaf

    - Panning

    Mise en place :

    ---boards
    ---Strap pans
    ---Serrated sheet pans

    { seams must be bottom down to prevent splitting of loaf while baking}

    -Proofing

    ---Put into a Proof Box, steamer.
    ---Almost the last fermentation.
    ---95°F -98°F , 80% humidity
    ---Proof according to product
    ---don't let dry out
    ---Touch

    {Finger imprint test

    1. Lightly tap the top of a loaf in the proofer-- Finger should stay imprinted in dough if proofed enough
    2. If proofed too long/not enough you can't repair dough.
    3. Over proofed dough can be put into a hotter oven to try & kill yeast immediately. To save product}


    20 March 2005

    Photography : Rolling Pins 0


    Rolling Pins
    Originally uploaded by abstract2concrete.

    Tip : Never put your rolling pins through any type of dishwashing. Always hand wash without submerging them. Otherwise the bearings will corrode, and the pin will lose it's smooth rolling action.

    To choose a good pin, run it along your table with a swift "U" shaped motion, lifting up after a few seconds.

    A good working pin will be left spinning (even though it is off the table surface)

    If it stops suddenly -- the bearings are too corroded. Don't use. Use can result in many problems, especially if working with laminated doughs.

    12 March 2005

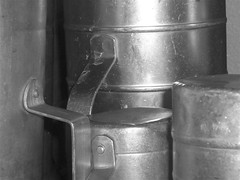
    Photography : liquid measures 0


    liquid measures
    Originally uploaded by abstract2concrete.

    Rarely used in the laminated pastry station [we scale liquids], we are more likely to use these liquid measures for bread formulations. We don't scale any liquids in the bread station ---we measure by volume. Probably becuase danish & puff dough formulas are very unflexable. If ingredients are mis-scaled the dough will be unworkable.

    Bread dough formulas are more flexable - most need more water than called for.

    09 March 2005

    Photography : Macro of a Docker 0


    Macro of A Docker
    Originally uploaded by Amber *.

    Dockers can be plastic or metal, in varying sizes.

    They are used to perforate doughs to allow for steam to escape while baking --- allowing control over the oven spring (rise) of the baked product. Products most often requiring dockers are pizza crusts, focaccia or cracker like wafers. Products you want to bake off flatter.


    06 February 2005

    Baking Bread: Trouble shooting 0

    holes in bread


    Large holes in bread :
    1. Dough was over kneaded
    2. Dough was proofed too long*

    *For Breads such as French or certain free form loafs , this can be an advantage.

    Doughy or Small, hard lumps:

    1. Original dough was not mixed enough*

    * hold back flour so dough can thoroughly mixed, work in additional dough as you knead

    Bread "Mushroomed" & there is a deep indentation around the bottom:

    1. The entire loaf has broken away from the bottom crust
    2. You tried packing too much dough into too small of a pan

    ++If a free form loaf:

    1. Oven was too hot causing the bottom to cook too quickly
    2. As the loaf rose it broke away and mushroomed [uneven & Denser]

    Free form loaf "spread" too much as it proofed

    1. Dough was too soft**

    * free form loaves must be firm when shaped. Add extra flour as you knead.

    When sliced - top crust "separates" from the rest

    1. Loaf was not properly formed
    2. Heat caused instant aeration when loaf was put in oven.*

    * not serious, alter your methods

    05 February 2005

    Baking Theory: Notes on Bread Baking 2

    Baking:

    1. Oven Spring {created in 5-8 minutes in oven, accelerated fermentation process}
    - Fermentation process

    1. Once dough reaches 140°F {yeast dies}
    2. Once dough reaches 165°F-175°F {gluten coagulates}
    3. Considered Par-baked --> ["brown n' serve products"] can be pulled from oven.
    4. Because products are Not caramelized--> causes quicker staling.

    - Caramelization

    1. Browning
    2. Internal temperature of fully baked bread = 210°F
    3. bread is sterile

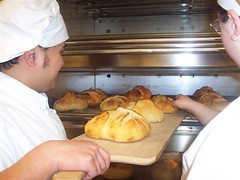
    Potato Bread shown here is rotated for even browning. Then baked until...

    ..It has caramelized. Potato Bread ready to cool.


    Rule of thumb for Oven temps :
    • LEAN products -
    1. The lower in fat, sugar , eggs {examples are Baguette or Italian Bread};
    2. also if Smaller units

    • RICHER products

    1. The Warmer, hotter oven
    2. The higher in fat, sugar , eggs { i.e Danish or Croissant}
    3. also if larger units
    4. The cooler the oven
    - Cooling, Slicing & Packaging

    -{Once you have mold in an area - spores will spread. Use vinegar to kill both mold & spores}

    DO NOT put in plastic bag & close before product is cool --> Mold will develope!

    1. via Condensation
    When to package:
    1. 95°F - 100°F is optimal temp --> {cool}
    2. Use back of hand to test for cool to touch


    15 January 2005

    Quotes from a pastry master... 0

    My Denmark born 4th generation Baker & Head Instructor.


    "When you can make true croissants & perfect Baguettes
    proficiently --- then you can call yourself a real baker"


    03 January 2005

    Back in the saddle or in this case ...apron again! 0


    First day, originally uploaded by abstract2concrete. 


    I was so nervous all night...I couldn't even sleep, I fell asleep around 1 a.m.

    Just knowing that I would soon be in a production bakery setting again was very exciting and at the same time nerve raking.

    ----- the night before ---

    Last night I got really stressed about not having my uniform together, the whites I'd ordered through the department weren't in yet. I wasn't able to get the whites or coat due to funding issues, and my aide check wasn't available until today. No stores were open that had uniforms anyway, So I went on a thrift store hunt --- at 5 p.m on a holiday weekend, on a Sunday!

    I found a white short sleeve shirt that worked, but no white pants , I checked both men's and women's.

    At one store I found 4 brand new chefs coats, and I thought "score!" but that was a let down ---all were size 4XX .Much too big. At the same store I found some "Skid Buster" culinary clogs and sneakers (brands that go for $50.00 online) -- brand new in boxes, after sifting through the size 15 men's I found size 7 in men's white sneakers. I tried them on and they fit good. They were $12.00 ! So I did score a good deal. Who cares if they were guys shoes.

    ----Arrival -----

    Frost was on the ground all day, so it was quite cold. I ended up buying my culinary whites at the college bookstore. So I walked past my class 2 times. Then I thought, "oh, crap - I should suite up". So I hurried to the restroom to put on my new white pants.

    I was still so jittery. But eventually I calmed down and breathed a little easier. The 2nd year students went off to their various stations,while me and the other new, 1st year, students went through orientation.

    As we rounded the orientation out by touring the bakery and kitchen, I felt like screaming: " it is truly bliss to realize what path you want, and are taking in life!", and I felt very at home with the smells of the kitchen, and the kindred spirits around me.

    02 January 2005

    baking 101 0


    baking 101
    Originally uploaded by abstract2concrete.

    So now I am alive with pure joy, knowing I will be pursuing a degree I love.
    And I have always thought that there was such a realness to all the people I have met in the Culinary industry.

    I remember classes from 5 years ago {for my chef certification}I was 18 years old. - on one such occasion in the hot summer, all the windows open and the oven going.

    Fellow students - Chad and someone else were making flat breads or was it rolls? Hmm.

    Well on with the story. They were teasing me about being a "newbie" in the culinary class. Chad at one point exclaimed "You have much to learn, grasshopper" with a snicker.

    Eventually I was taken into the normal routines of kitchen life, and I earned the respected role of old timer, to other new culinary students.

    Well now I feel as though I am a grasshopper again. Today was rather laid back. Not much was expected of me -- being a new student. When I wasn't observing, I scaled out 2 croissant master recipes for tomorrow morning. Later my peers and I watched the ingredients for the dough forming and congealing as it was whisked back and forth with the dough hook, in the Hobart. I love the smell of bread dough.

    Type-A Parent New York City Bootcamp (Focus: Brand-Blogger Relations)
    Related Posts Plugin for WordPress, Blogger...

    Back to TOP